Free delivery on orders over £35
|
Beautiful Nails, Beautiful Savings
|
Fresh nail designs every week!
|
|
Free delivery on orders over £35
|
Beautiful Nails, Beautiful Savings
|
Fresh nail designs every week!
|
|
Choose what you are happy for us to use. Essential cookies keep the shop working, so they stay on.
Needed to run the shop: your basket, secure checkout, your login, fraud prevention and remembering this cookie choice. These cannot be switched off.
Remembers how you like the site to look and behave — recently viewed shades, your wishlist and display settings. Nothing here is based on your interests or used for advertising.
On by default for this purpose. Switch it off and we will stop.
Helps us count visits and see which pages and products people struggle with, so we can improve the shop. We use Google Analytics for this.
Lets us show you our ads on Google, Meta and other sites, and measure whether those ads led to an order. This involves sharing data with those companies.
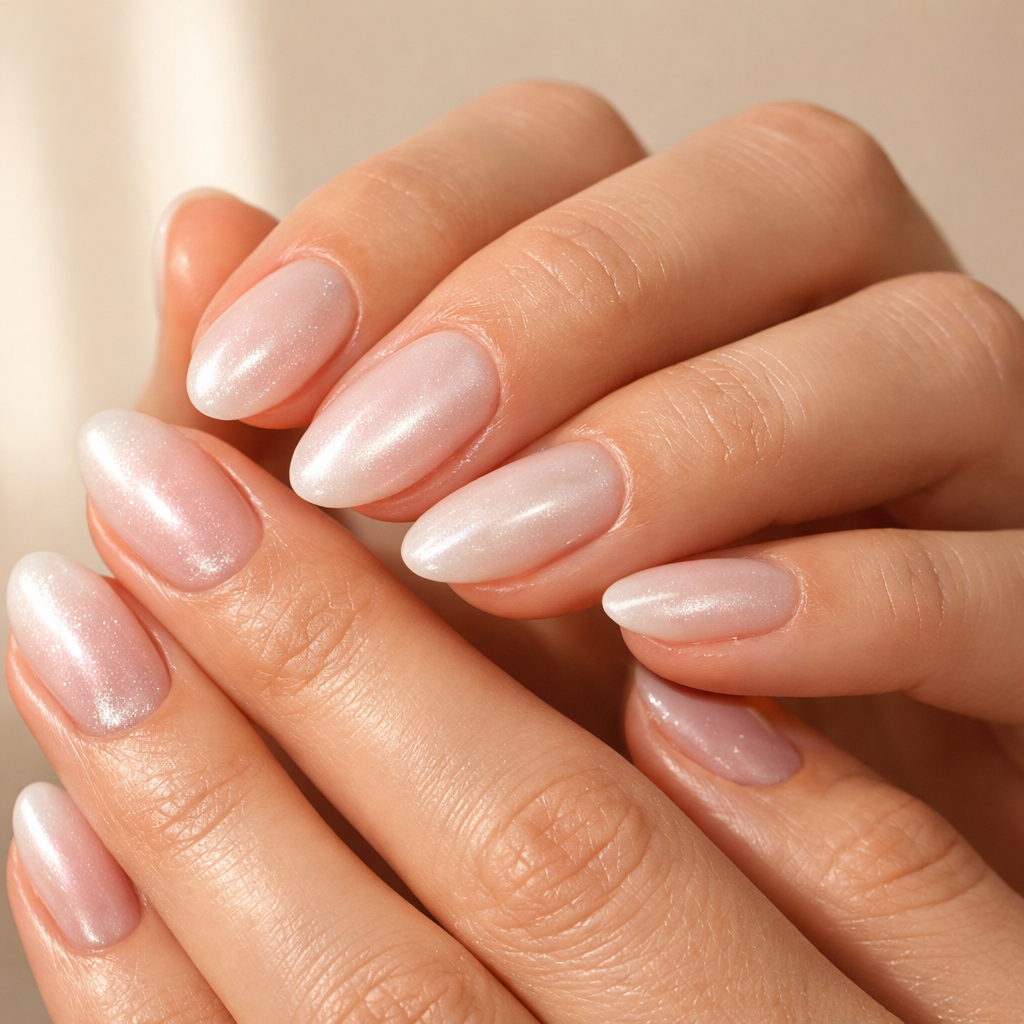
Pearlescent nails at home are one of the easiest ways to get that soft, light-catching “glow” manicure without booking a salon appointment. With the right finish (think milky white, champagne and pearl tones) and a few prep tweaks, you can get a smooth, glossy look that reads pearly in daylight and luminous under indoor lights.
If you’re building your first glow mani kit, start with the essentials: Velvora Gel Nail Strips Starter Kit plus a little aftercare. When you’re ready, shop now and pick a pearly shade that matches your vibe.
Pearlescent nails are a light-reflective manicure finish that looks luminous and softly shimmery, rather than glittery or metallic. The “pearl” effect comes from ultra-fine reflective pigments that scatter light in a smooth way, so the nails look creamy and glossy with a glow that shifts as you move your hands.
In our experience, the biggest difference between “pearly” and “sparkly” is particle size and contrast. Glitter has visible particles; pearlescent finishes look like a continuous sheen, especially in milky whites and soft pinks.
Pearlescent nails at home are easiest with ready-to-wear finishes like nail strips, because the shimmer layer is already perfectly even. You can also create a pearly look with polish and a pearlescent top coat, but it takes more drying time and can streak if your base isn’t smooth.
Semi-cured gel strips are partially cured gel, pre-shaped into strips, which you finish under an LED lamp to harden. After testing across hundreds of nail shapes and sizes, we find most first-time users get a glossy, even pearly finish quickly because there’s no brushwork and no waiting for layers to dry.
If you’re browsing finishes, start with the main gel nail strips collection, then narrow down by effect. For a more reflective, party-ready take on pearly nails, you can also explore chrome and metallic gel nail strips.
Nail polish strips give a smooth, glossy look without curing, and they’re great if you want an easy glow manicure with minimal kit. If you’re curious, browse nail polish strips for pearly, satin and shimmer-leaning shades.
Polish lets you layer and mix finishes, but pearlescent looks can show brush marks and take longer to fully dry. If you’re short on time or want a reliably smooth sheen, strips are usually the easier route.
The secret to pearlescent nails is a flawless surface—any bumps, ridges or lifted edges catch the light and make the shimmer look uneven. If you want the most reliable result, follow a consistent prep-and-seal routine.
For the full walkthrough with photos and timing, use the gel strip application guide (it covers trimming, curing and edge sealing in detail).
One thing we hear from customers time and again is that pearly finishes look most “salon” when the edges are properly sealed. After curing, run a nail file downwards along the free edge (never sawing back and forth) to remove any overhang, then do a final short cure. This prevents hair snagging and keeps the shine looking crisp.
The most flattering pearlescent nails usually match your undertone: warm undertones glow in champagne and peachy pearls; cool undertones shine in milky white and soft pink; neutral undertones can wear almost any pearly shade without it looking “off”.
If you’re shopping by effect rather than a single shade, browse glitter gel nail strips for that “pearl-but-brighter” look on nights out.
Pearlescent nails at home can look just as glossy as salon gel, but the best method depends on your time, budget and how sensitive your nails are. Here’s a clear comparison based on what we see in real customer routines.
| Method | Finish for pearlescent looks | Time & effort | Typical wear (realistic) |
|---|---|---|---|
| Semi-cured gel strips | Very smooth, even sheen; great for “glow” effects | About 10–20 minutes incl. curing | Up to 2 weeks with good prep |
| Nail polish strips | Glossy, softer sheen; depends on top coat choice | 10–15 minutes; no lamp | About 5–10 days |
| Salon gel polish | High shine, strong “glass” look | 45–90 minutes + appointment | About 2–3 weeks (varies) |
| Press-ons | Can be very glossy; edges may look thicker | 10–30 minutes; sizing matters | 1–10 days depending on glue/tabs |
Cost-wise, gel strips typically start from around £10 per set, and each set includes 20 strips in mixed sizes so you can fit most nail beds without custom ordering. If you’re building a regular routine, our community often likes the convenience of a subscription box for fresh designs delivered to your door (especially if you change your nails with your outfits or events).
Ready to try the pearly trend with minimal fuss? Browse the full collection and pick a glow finish for your next mani.
Pearlescent nails last longer when you control oil, seal the edges, and moisturise the skin (not the nail plate). The shimmer itself doesn’t make a manicure chip, but pearly finishes do make small lifts more visible, so longevity prep matters.
For simple daily aftercare, we love a pen format because it’s quick at a desk or on the sofa. Try the Vanilla Cuticle Oil Pen (sweet, not overpowering) or the Watermelon Cuticle Oil Pen for a fresh option.
Pearlescent gel strips are generally considered a lower-fuss at-home option when they’re made to UK/EU cosmetic standards and you use them as directed (including proper curing and safe removal). The key is choosing brands that are compliant, transparent about ingredients, and designed for home use.
In simple terms, 14-Free means the formula avoids a set of commonly avoided ingredients, and HEMA-Free means it’s formulated without HEMA, a known sensitiser for some people. If you have a history of reactions, it’s still wise to patch-test and stop if you notice irritation.
Velvora products are 100% vegan, cruelty-free, 14-Free and HEMA-Free, pregnancy safe, and UK/EU compliant (including CPNP registration and REACH certification). For full details, you can review our standards on product safety and ingredients.
For additional context on cosmetic rules in Europe, see the EU Cosmetics Regulation (EC) No 1223/2009 overview.
Velvora is built for at-home nail lovers who want a clean, modern finish without the salon hassle. Our semi-cured gel strips are made in certified facilities (ISO9001, FDA, SGS, BSCI) and cut with Japanese blade technology for crisp edges that sit neatly on the nail.
We also keep it practical: UK-based shipping and support, free UK delivery on orders over £35, and a 30-day satisfaction policy so you can try the trend with confidence. If you’re new, a starter kit plus a cuticle oil pen is usually enough to get going comfortably.
Use a pearly-finish strip (semi-cured gel or polish strips), apply it to clean, dry nails, seal the edges with a downward file, and finish with proper curing if you’re using gel strips. This gives a smooth, even sheen without brush marks.
Milky white and soft pink usually read the most pearlescent because they reflect light evenly and look luminous in natural daylight. If you want a warmer glow, choose champagne-leaning shades.
They can show edge lifting more clearly because the light-catching sheen highlights unevenness. The fix is simple: size slightly smaller than your nail, seal the free edge carefully, and avoid soaking hands right after application.
With good prep and proper curing, semi-cured gel strips can last up to 2 weeks. Your results depend on nail oiliness, how often your hands are in water, and whether you cap and file the tips after curing.
Yes. Velvora products are 100% vegan and cruelty-free, as well as 14-Free, HEMA-Free, pregnancy safe, and fully UK/EU compliant (including CPNP registration and REACH certification).
Use cuticle oil daily and wear gloves for cleaning. Oil keeps the surrounding skin comfortable (so you don’t pick at edges), and gloves protect the shine from detergents and hot water.
If you’re ready for a luminous, light-catching manicure, find your perfect shade and try the pearlescent trend at home—Velvora-style.
Related reading: If you want more practical tips beyond the glow finish, our team also recommends learning the small prep details that change everything: how to apply gel nail strips like a pro and cuticle care 101.

No account yet?
Create an Account
